Showing posts with label baking. Show all posts

Thursday, October 4, 2012

Sweet & Salty

Today was baking day at work. I found these little gems on Pinterest (where else??) and tracked them down to Megster Meter. Her pictures are really great - so check them out.

This "recipe" only has 3 ingredients - mini pretzels, Hershey kisses & M&M's.


Place the pretzels on your baking pan in a single layer. Preheat oven to 275 degrees.


Top each pretzel with a Hershey kiss.


Place pan in oven for 3 minutes. 
Kisses come out soft and melty.

Immediately press an M&M onto tip of kiss.

Then place in fridge to firm up. All done!

Of course we skipped the fridge part. We placed them immediately into our mouths. And there was melted chocolate pretty much everywhere - on hands, smeared on mouths, shirts, table. Oh well, they really enjoyed them!

I found these Candy Corn White Chocolate M&M's. They are nice fall colors - white, yellow and orange. My residents unwrapped the kisses, and placed them on the pretzels in the pan. I placed all the M&M's on top of the kisses. One resident told me I was using too many white ones, "Use more color on those!" 


And one resident asked me if I didn't trust them to put the M&M's on top. Um, busted. I did want them to look pretty and not have melted chocolate everywhere. After we taste-tested it was too late for that.


We made a gazillion in just a 1/2 hour. And we're thinking of doing them again in Red & Green for December.

I'm really glad I got my 4-mile run in this morning so I could munch a few of these!


Enjoy!


Pin It Now!

Friday, September 21, 2012

Friday Confessions 9.21.12

Well, it's time to 'fess up again. Time flies - seems like I just did this!

I confess that I'm borderline nervous about my 8K tomorrow - Ache Around the Lake. I'll be glad when it's started. Once I start I can focus on my steps, my breathing and getting up and over the hills (they are pretty torturous). It's not called an "Ache" for nothin'. 

My 90 day challenge is going well, and in fact today is day 30 - so there will be an update post soon, hopefully by the end of the weekend. I'll retake my sexy porn photos (my before, during and after photos), take my measurements and weigh myself. I confess, although it's been a good month, I'm not keen on taking those pictures!


Yesterday was baking day at work, and since the first day of Fall is almost upon us - we celebrated the Great Pumpkin with "Pumpkin Dump Cake". 

Oh. My. The recipe makes one 9X13 pan, so we doubled the recipe and made 4 8X8's. We have a reputation on Thursdays that we have to live up. Lots of goodies for whomever (almost) wants some. And the group I have is not interested in watching me do all they work, they actually want to stir, mix, crack the eggs and be involved in the process. So we have to make lots of whatever we make.

Our group went over time, so I confess that this is not a picture of the one we baked, but it's really close.


It was super-easy - has to be for us to use it in our baking group, and EVERYONE loved it. I myself could have eaten an entire pan, but limited myself to a semi normal sized portion. 

The recipe I had printed out read "serve with whipped topping or ice cream", and the resident I had reading the recipe for me kept going to that. "Caroline, this says 'serve with whipped topping or ice cream.'" The first time or two I am very patient - "Yum, wouldn't that be good?" After 4 times I say "Well, sorry, we don't have any of either." So there. After we all tasted it though, it didn't matter anymore. It was really good. This would wonderful for Thanksgiving. 

Here's the recipe if you are interested for yourself:

Pumpkin Dump Cake

Ingredients:
1 can (15 oz.) pumpkin puree
1 can (12 oz.) evaporated milk
3 large eggs
1 cup brown sugar
3 tsp pumpkin pie spice
1 (18 oz.) box yellow cake mix
1 - 1½ cups chopped pecans 
1 cup butter, melted

Directions:
Preheat oven to 350°.  Grease bottom of 9x13″ pan.  

Mix pumpkin, milk, eggs, sugar, cinnamon, and salt.  Pour mixture into greased pan.  Sprinkle dry cake mix over pumpkin mixture and top with pecans.  Drizzle melted butter over pecans.  

Bake 40-50 minutes or until edges brown.

Let sit 15 minutes before serving.


What are you confessing this week? What's your favorite fall-season food?


If you want to join in - hit the button to head over to High Heeeld Love. She's hosting while Mamarazzi takes a bloggy break.


Photobucket
Pin It Now!

Wednesday, June 27, 2012

Crock Pot Bread?

I've baked several different kinds of bread in the past few years. I came across this "Almost No-Knead Bread" a couple of years ago. It makes a lovely round loaf - I use my cast iron dutch oven, with the lid. And with the water, you also use a little brew, it adds a mellow flavor to the bread.


I found this recipe on Pete Bakes!, but I don't think Pete is baking anymore. There haven't been any updates for over a year. There are some very nice recipes on his site, still, so go ahead and check it out.


Well, on Pinterest last week I came across a Crock Pot Bread blog. I just had to try it out. The blog didn't give a bread recipe, just stated to use one pound of fresh or purchased dough. I decided to use my no-knead recipe. 


And if you don't know what Pinterest is - it is an organizational tool for all the stuff you love online. Within the Pinterest website you create "pin boards" . For example, I have a board for ideas I want to try at work (WBC Ideas), things for working out (Workin' It), recipes (All about Food), etc. You have to receive an invitation to join pinterest, so if you are hankerin' to get on there - let me know and I'll send you an invite.


It is a shaggy thing right after mixing.
In the crock pot
The instructions for using the crock pot were simple. When you get to the second rise, (which is quite short compared to the 8-18 hour first rise), you place the dough in the pot, turn it on high and wait an hour. The premise is that it will rise while the pot is heating, and then bake itself - all in within an hour.
Bubbly


While waiting for my dough to proof (the first rise), I found another blog on pinterest all about no-knead bread and different add-ins for it. This blogger uses an enamel covered cast iron dutch oven for her bread baking. After reading through her bread recipe, I almost ditched the crock pot idea experiment. I was crazy for homemade bread at that point, and knew I already had a no-fail method. But I still wanted to give the crock pot a go. So, at the right time I scooped up the bubbling dough and lightly kneaded it into a nice round shape. Then plopped it onto a piece of parchment paper, and into the crock pot. I used my fastest cooking pot, turned it on high and set the time for one hour.


An hour later, it had risen, and seemed to be baking, but was no where near being done. So I added 15 minutes, then another 15 minutes....all told it was in the crock pot for at least 2 hours, then I had to put it in the oven under the broiler to get it brown. I didn't weigh my dough - maybe it was more than a pound?
Lovely color, but still heavy and gummy
Decent crumb, but dense


So good-bye crock pot bread. This is not the way for me. I was interested in this because it really saves the kitchen from getting all heated up in the summer. 
      The bread, although a bit gummy, has a nice flavor. I think I'm going to make croutons out of it. I was so disappointed that I already have another batch proofing on my kitchen table. Tonight it will go in the cast iron dutch oven just a wad of dough, and come out a star.


almost no-knead bread


(from Pete Bakes!) 

3 cups unbleached all-purpose flour (15 oz), plus additional for dusting work surface
1/4 tsp instant or rapid-rise yeast (or 1/2 tsp dry active yeast)
1 1/2 tsp table salt
3/4 cup plus 2 Tbsp water (7 ounces), at room temperature
1/4 cup plus 2 Tbsp mild-flavored lager (3 ounces)
1 Tbsp white vinegar

1. whisk flour, yeast, and salt in large bowl. add water, beer, and vinegar. using rubber spatula or a wooden spoon, fold mixture, scraping up dry flour from bottom of bowl until shaggy ball forms. cover bowl with plastic wrap and let sit at room temperature for 8 to 18 hours.

2. lay 12- by 18-inch sheet of parchment paper inside 10-inch skillet and spray with nonstick cooking spray. transfer dough to lightly floured work surface and knead 10 to 15 times. shape dough into ball by pulling edges into middle. transfer dough, seam-side down, to parchment-lined skillet and spray surface of dough with nonstick cooking spray. cover loosely with plastic wrap and let rise at room temperature until dough has doubled in size and does not readily spring back when poked with finger, about 2 hours.

3. about 30 minutes before baking, adjust oven rack to lowest position, place 6- to 8-quart heavy-bottomed dutch oven (with lid) on rack, and heat oven to 500F. lightly flour top of dough and, using razor blade or sharp knife, make one 6-inch-long, 1/2-inch-deep slit along top of dough. carefully remove pot from oven and remove lid. pick up dough by lifting parchment overhang and lower into pot (let any excess parchment hang over pot edge). cover pot and place in oven. reduce oven temperature to 425F and bake covered for 30 minutes. remove lid and continue to bake until loaf is deep brown and instant-read thermometer inserted into center registers 210 degrees, 20 to 30 minutes longer. carefully remove bread from pot; transfer to wire rack and cool to room temperature, about 2 hours.
Pin It Now!

Sunday, June 17, 2012

Red Velvet Heaven

My co-workers think I'm crazy, but I've been looking forward to this for over a week.


Where I work we have THE best birthday parties for each other. I keep an updated list of all of our favorite things - candy, drinks, snacks, what we collect, gift cards, etc. Each of us gets a copy at the beginning of the year, and on our birthdays we get a smorgasbord of all our favorite things.


This year we added "Favorite Cake". Well, one of the girls loves Red Velvet Cake. I've never made one before, so I was actually really excited about baking it for her.


Last week I made sure I had all the ingredients, cause that's pretty much a huge bummer when you set out to bake something and you are missing just one key thing (like eggs, sugar, food coloring).


This recipe called for buttermilk. These are my favorite kind of cake batters.  Because this rich-tasting milk is an acidic ingredient, like yogurt and sour cream, it helps tenderize the gluten in batter, giving the cake a softer texture and more body.


Sometimes, when I am in a tight spot, and need to bake a cake in a hurry I will use a cake mix, and use buttermilk for the liquid. This really adds a "homemade" taste.


Also in this recipe is a tablespoon of vinegar and baking soda.  Most Red Velvet cakes include vinegar & soda. After all the other ingredients have been mixed, you add the vinegar and baking soda by hand. This creates a lovely foaming action. These tiny little oxygen bubbles will then be folded into the cake batter, and this causes the cake to bake into a light, fluffy tasty treat. 


When I dumped in the entire bottle of red food coloring, the batter turned bright red. For an instant I thought about those chemicals that I had just added to the batter, but this was for a friend, so I kept the mixer going until it all turned a nice shade of pink/red. I have a friend who is adverse to artificial anything, and she told me she made a Red Velvet Cake a few years ago, and left out the red food coloring. She called it her "Suede Cake". 


I decided to bake 3 layers, and when I do - I just use 3 pans. I don't like cutting layers in half, so this has worked very well for me the last few years. I also weigh my layers. I pull out my food scale, and weigh each pan to make sure all three layers weigh just about the same. Then I scoot the pans around on the counter to even out the batter in the pans. After I got them in the oven, we moved furniture around, with the help of our neighbors.


We were laughing, telling stories, outside our back door. We have the best neighbors ever!  I'm not sure how long we were out there, and then AAAAHHHHH!!!! The cake!! I ran inside to pull them out of the oven. The timer had gone off at some point, but miraculously they weren't overdone. Big scare.


I made 2 batches of the cream cheese frosting. I just figure you can't have too much, and it's terrible to run out while frosting the cake. The key to cream cheese icing is to make sure the cream cheese and the butter are very soft, but not melted. I left mine out for a couple of hours before I needed them. You can soften in the microwave, but the results are not always ideal. I used the straight icing between the layers, and then a light base layer on the outside, around the edges - to fill in the sides. I added pecan pieces to the rest for the top and sides. Oh, how I want to cut it and see how it looks! But that will have to wait until tomorrow.


I think my first Red Velvet Cake is really beautiful. I hope it tastes good too!


Well, since the cake is all done, it's time to exercise. I'll cross train tonight, and ride my exercise bike. Maybe exercising tonight will help burn off the cake calories I'll eat tomorrow. Maybe? 


UPDATE:
Here is a photo of the yummy, rich red slice. I have to say, it was delicious!


Red Velvet Cake (recipe given to me by my friend, Freda)


Ingredients:


Cake:
1 1/2 cup sugar
1/2 cup Crisco
2 cups sifted cake flour
1 tbs cocoa
1 tsp salt
2/3 cup buttermilk
1 oz red food coloring
1 tsp vanilla
2 eggs
1 oz water
1/3 cup buttermilk
1 tbs vinegar
1 tsp salt


Icing:
1 stick butter (softened)
1 8oz package cream cheese (softened)
1 box powered sugar
1 tsp vanilla
1 cup chopped nuts


Directions: Mix sugar, Crisco, cake flour cocoa and salt. Add to the mixture the following items: 2/3 cup buttermilk, food coloring, vanilla, eggs, water and then the additional 1/3 cup buttermilk. Beat well and then stir in the following by hand: vinegar and soda. Bake in two layer pans at 350 for 25 minutes.


Icing: Mix all items for the icing and spread on cake. Pin It Now!

Friday, June 1, 2012

Monkey Bread = Carb Loading

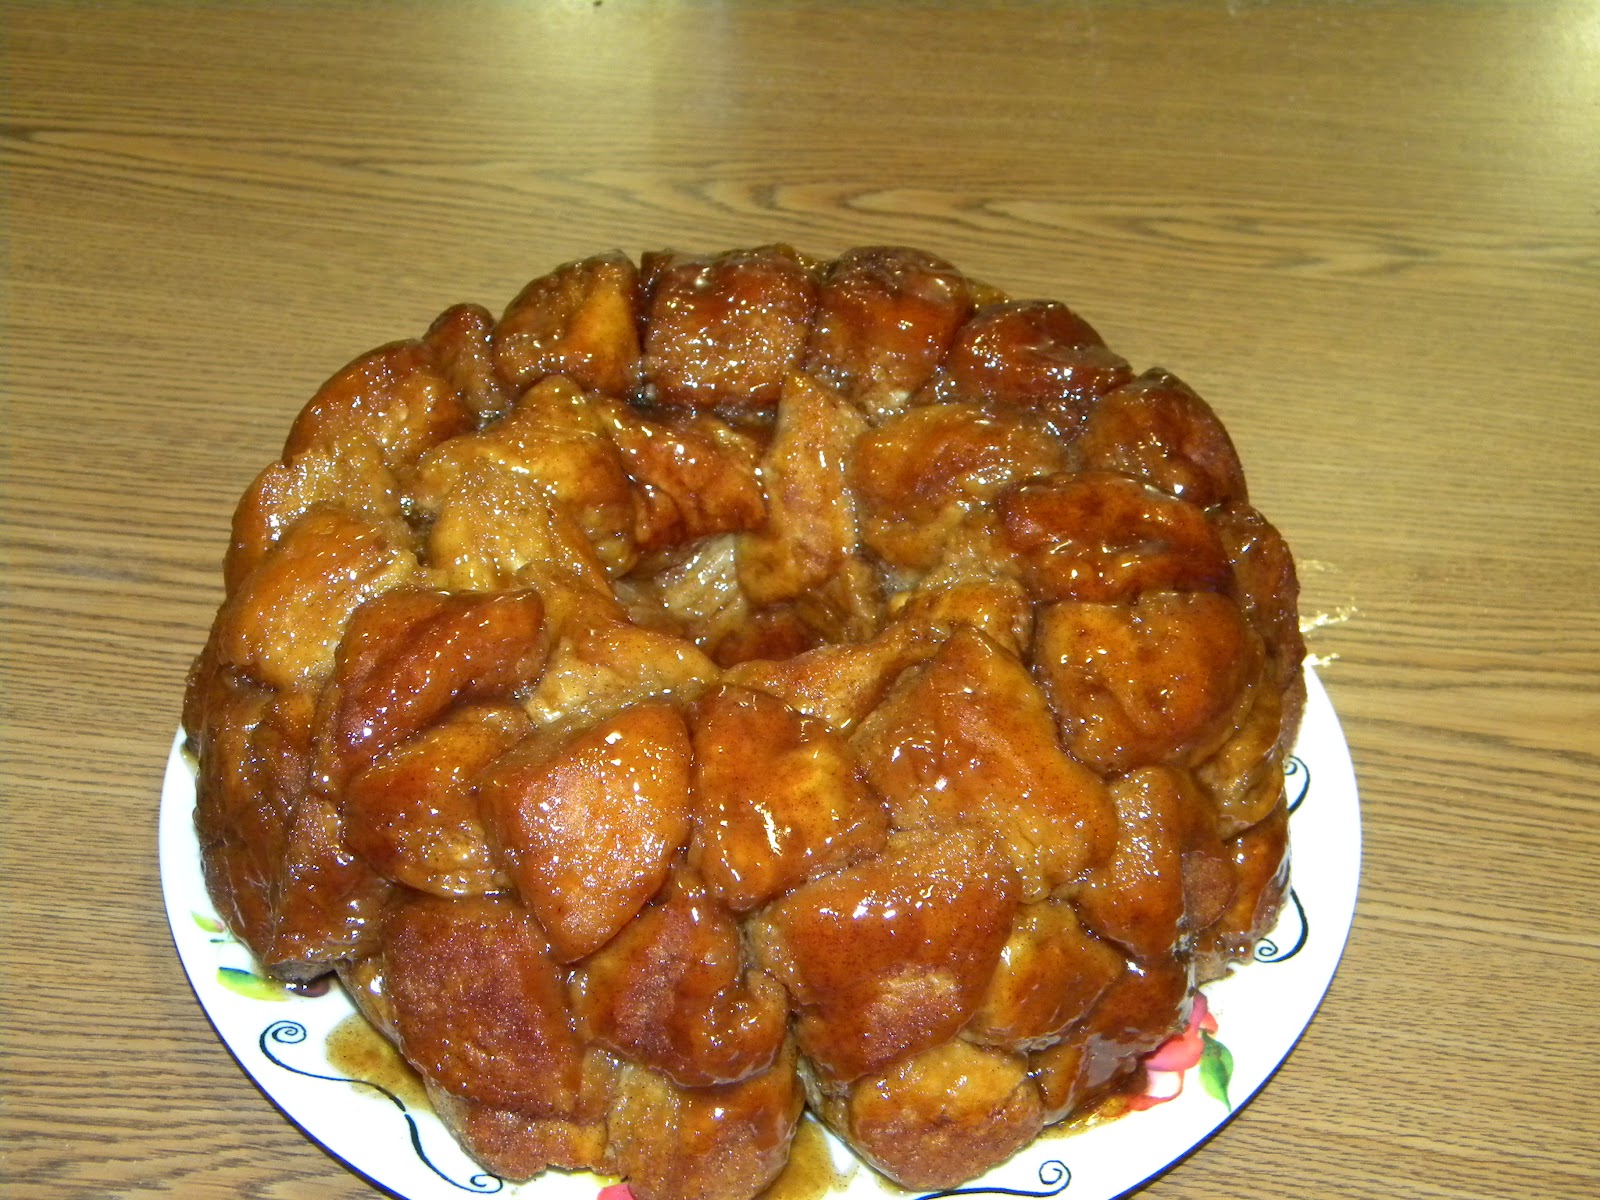
Well, Monkey bread is definitely carb loading, but not in a good way. It wouldn't take much, though, to convince me that eating a hefty portion of the lovely cinnamon pull-a-part pastry would give me extra energy on Sunday for Mad Mountain. It. Is. So. Good.


Most every Thursday is baking day at work. One of the perks of being an Activity Director is that I plan the calendars. And I can do the things I love.


This week was Monkey Bread - a resident and staff favorite, to say the least. I have a special fondness for Monkey Bread, because it was one of the things my grandmother would make. Her recipe called for frozen yeast rolls, butterscotch pudding, pecans, sugar and lots and lots of butter. All this would be placed in a bundt pan and left to rise over night in the oven, then baked to perfection for breakfast. For my weekly cooking group we use a very simple recipe so the residents who choose to, can participate with a fair amount of ease.


I've included the recipe at the bottom, but we really don't follow it 100%. I'll tell you all our shortcuts. Our staff love the recipe and many of them have used it with their kids. 


First, I don't measure anything. I toss some sugar and cinnamon in a ziploc bag and shake it up. I give a bag to each resident. One resident is our "expert biscuit cutter" - cutting all the biscuits into 4, or 5 or 7 pieces (whatever she remembers to do). All the pieces are divided among the other residents, and they coat them and toss them into pans. The very first time we did Monkey Bread, we did it in a Bundt pan. And it was beautiful.


When we took the bread out of the oven, there were "oohs and aahs" all around. "Is THAT what we did??" They were amazed. And it was delicious.


But that takes a good while to cook, and our group is just over an hour. I needed to speed things up. So, we tried pie plates of Monkey Bread - just as delicious, but not as pretty. Then we tried making cupcake monkey bread. Perfect. Each muffin cup gets 4-6 pieces of covered dough, depending on the size. Just enough for the cup to look full.


And we've stuck with that every since. Today one of my ladies dumped all her sugar mixture into the bowl with the dough pieces and started stirring it all together. It was a very clever idea, and got the job done. I'm  amazed at ways they can still make things work for them, even when their minds are betraying their bodies.

Well, now the question is, do I really need to "Carb-load" for the mud run? Probably not. Maybe a few extra (good carbs), but nothing crazy like 6 monkey bread cupcakes.

On Sunday I'll be covering 3.5 miles and 23 obstacles. Whew! I've got a checklist of things to do, take and remember.There has been lots of advice, and I am as ready as I can be at this point. About a month ago I added a 2-3x week weight circuit (thanks to one of my sisters) to my training. I can tell a difference in my legs and arms, but will still be challenged by anything that requires me to pull myself up or climb over. I've been running steadily and regularly. Our team is ready and whatever else happens, we will have a great time, with lots of laughs. Here's what I'm pretty sure I'm going to look like on Sunday:


Everyone of age gets a free beer at the finish. I'm not really a beer girl, but I'll probably drink it because I will feel like I earned/deserve it!

I'll post a report afterwards. But while you are waiting on that, bake yourself a batch of yummy Monkey Bread, get a nice cup of coffee, or hot tea, sit back and savor.


Monkey Bread (from cooks.com)


3 packages buttermilk biscuits (refrigerated) 
1 cup sugar (divided)
2 teaspoons cinnamon
1 cup butter
1/2 cup brown sugar


Take the biscuits out of tubes, and cut each one into 4 pieces. Mix sugar and cinnamon in a ziploc bag. Drop pieces in bag and coat well. Place coated pieces in a well buttered Bundt pan.


Put 1/2 cup of the leftover sugar/cinnamon mix, 1/2 cup packed brown sugar and 1 cup of butter into a small saucepan.


Bring this mixture just to a boil; remove from heat immediately. Carefully drizzle over coated dough pieces.
Bake at 350F for 35-45 minutes.


Cool slightly in an upright position, then tip pan over onto a plate. Enjoy! Pin It Now!

Monday, May 28, 2012

Baking, and...Running?

I've been baking for as long as I can remember - cookies are a passion, but I also like to bake cakes, cheesecakes and all kinds of breads. Baking is therapy for me. There are times when I am stressed out, and all I want to do is create something in my oven. The mixing of the dough, icing the cake, kneading the bread releases tension in my muscles and creates a peaceful environment. And the finished product brings joy to others and fulfillment for me.


But, since I sample most everything that comes out of my oven - I need to exercise. Up until a year ago walking was my main movement.

I needed something more. I chose running because it burns the most calories in the least amount of time. Well, this is true, but it does take some time to be able to run for any length of time in order to burn those calories. I'm proud to say I've been running for almost a year, have a number of 5K's and one 10K under my belt. And after next weekend, my first  Mad Mountain Mud Run.  

Running is one of the very best things I have done for myself. I don't run fast, and I don't run all that far (yet), but I am running. Not only have I met some really wonderful people, especially in the Tryon Running Club, but I feel empowered to do things I didn't think I could. The upcoming Mud Run, for example. Never in a hundred years would I have ever thought I could do it, let alone want to, until I started running. Running, like baking, brings me back to peace and brings confidence. And while I give away much of what I bake, running is a gift I keep.

One of my favorite quotes is "Make it Work for You." I'm making my life work for me. We all get thrown curves that we aren't expecting, and sometimes life is hard and messy.  All I can do is take what I've been given, and make it work for me the best it can.


Primarily this blog will focus on my ups and downs of baking & running, and life in between.
Pin It Now!